

Hello everyone! Today I am going to
show you the basics of how to make a Spirit Board doll. In this tutorial, you
may also learn helpful techniques that you can apply to your own unique
creations. For this tutorial, I will show you how to paint the eyes, rather
than how to sculpt them (I need to keep some of the magic a secret!) Also, this
pattern is NOT to be used in mass production. I am making this pattern
available for other crafters like me, who are sole proprietors or crafty people
that just want to give it a try for fun!
Firstly, here is the pattern!


Coffee Staining Fabric
I believe you can buy khaki colored
cotton twill, but I like to make everything from scratch, if at all
possible. Plus, I love the smell of
coffee! If you were able to find khaki
colored twill, go ahead and skip this step, but if you are up for the challenge
or would just plain like to learn how to coffee stain, then follow along!
Step 1:
Brew your coffee. I like to brew
mine on the darker side because I feel like it clings better to the fabric. Depending on how much fabric you are using,
determines the amount of coffee that you will require. I go by 10-12 cups for every ½ yard of fabric.
So, for 10 cups of coffee, use six scoops of coffee and fill
the water to the 10-12 marker on your machine.

Step 2:
Once coffee is brewed, poor it into your large Pyrex bowl. Soak the fabric in the coffee for 30 minutes.
Step 3:
DO NOT DUMP THE COFFEE YET!!!
Rinse the soaked fabric with COLD water until the water runs clear, then
hang the fabric to dry. You can also
ring it out and toss it in the dryer if you are feeling too excited to wait.
*Once the fabric is dry, if the coffee color is not as dark
as you would like it to be, simply reheat the coffee in the microwave and soak
the fabric again, checking it’s color every 10 minutes.

Making the Head
Step 1:
I always start with the head.
Using the pattern provided, cut one
rectangle out of the cotton twill. Next,
cut another rectangle about ½” larger all the way around. Then cut four rectangles out of the batting,
about 1” larger than the pattern all the way around (The batting is not an
exact science. It will be cut down later.)

Step 2:
Fold the smaller piece of fabric in half, then run your fingernail down the fold to make
a crease in the fabric. On the front of
the fabric, use a pencil to make three marks on the sides and bottom one half
inch from the edges. This will help you
determine where to stitch the mouth. Now
imagine that there are two perpendicular lines going horizontally, starting 1”
from the bottom mark and are spaced 1/2” apart, as seen in the picture
below. This will be the range for the
top and bottom of the mouth. (Sorry there was an extra fold in the fabric...just ignore that one!)


Step 3:
Using your guide lines as a reference, lightly draw the shape of the
mouth with your mechanical pencil.


Step 4:
Place face rectangle on top of two pieces of batting. Thread embroidery thread through embroidery
needle. Bring needle through one end of the
mouth and back through the other end, forming a straight line with the
embroidery thread.


Step 5:
Using black thread and needle, stick the needle through the batting and
fabric where the pencil line is drawn, about ¼” down from the end of the
mouth. Do this on the side that the
embroidery thread is tied off. Once the
thread is pulled through, loop it over the embroidery thread and bring the
needle back through the fabric. Do this
every ¼” until you get to the other end of the mouth. This will hold the embroidery thread in the
shape that you want it. Tie off the
regular black thread. Now it is time to
make the stitches on the mouth.


Step 6:
Take the embroidery needle and open end of embroidery thread and come
back through the batting and fabric about ¼” of the way down underneath the
mouth. Cross over the mouth and bring
the needle back down above the mouth.
Continue doing this all the way to the other side. Then tie off the embroidery thread…your mouth
is done…YAY!


Step 7:
Trim the excess batting from sides and bottom of the face…but not the
top!

Step 8:
Place Spirit Board face and other coffee stained rectangle together,
facing each other. The back side of the
fabric should be facing out. Then put
the two remaining pieces of batting on the side that doesn’t have any batting. (Sort of like a sandwich with the batting on the outside.)

Step 9:
Place pile so that the face batting is at the top of the pile, as seen
in picture. Then sew ¼” in along the
edge of the face on the sides and bottom only.
Then trim off excess fabric on sides and bottom only, leaving ¼” of
fabric and batting all the way around from sewn lines. Be sure to cut the bottom corners at an
angle.


Step 10:
Turn head inside out.

Step 11:
Fold top in approximately ¼”- ½” and pin closed. Then using black thread and needle, sew an
overcast stitch along the edge.


Step 12:
Now that your Spirit board head is sealed all the way around, it is time
to do the finishing touches. Using a
sewing machine or needle and thread, sew a line 1/4” from the edge all the way
around.

Step 13:
Before painting anything else on the face, always start with
the eyes. Once the eyes are outlined, it
will be easier to see where everything else should go.

Step 14:
Next we will draw and paint the letters on the top. Remember the fold that went down the center
of the face? Start at the top and write the
letter “G” with your mechanical pencil where the fold would be. Directly under that, write the letter
“T”. Under the “T”, right the letters
“5” and “6” on either side of the fold line.
This will keep your letters and numbers centered. The top row of letters should be “A” through
“M”. The bottom letters should be “N”
through “Z”. It is always a good idea to
write these things out first before committing to painting.

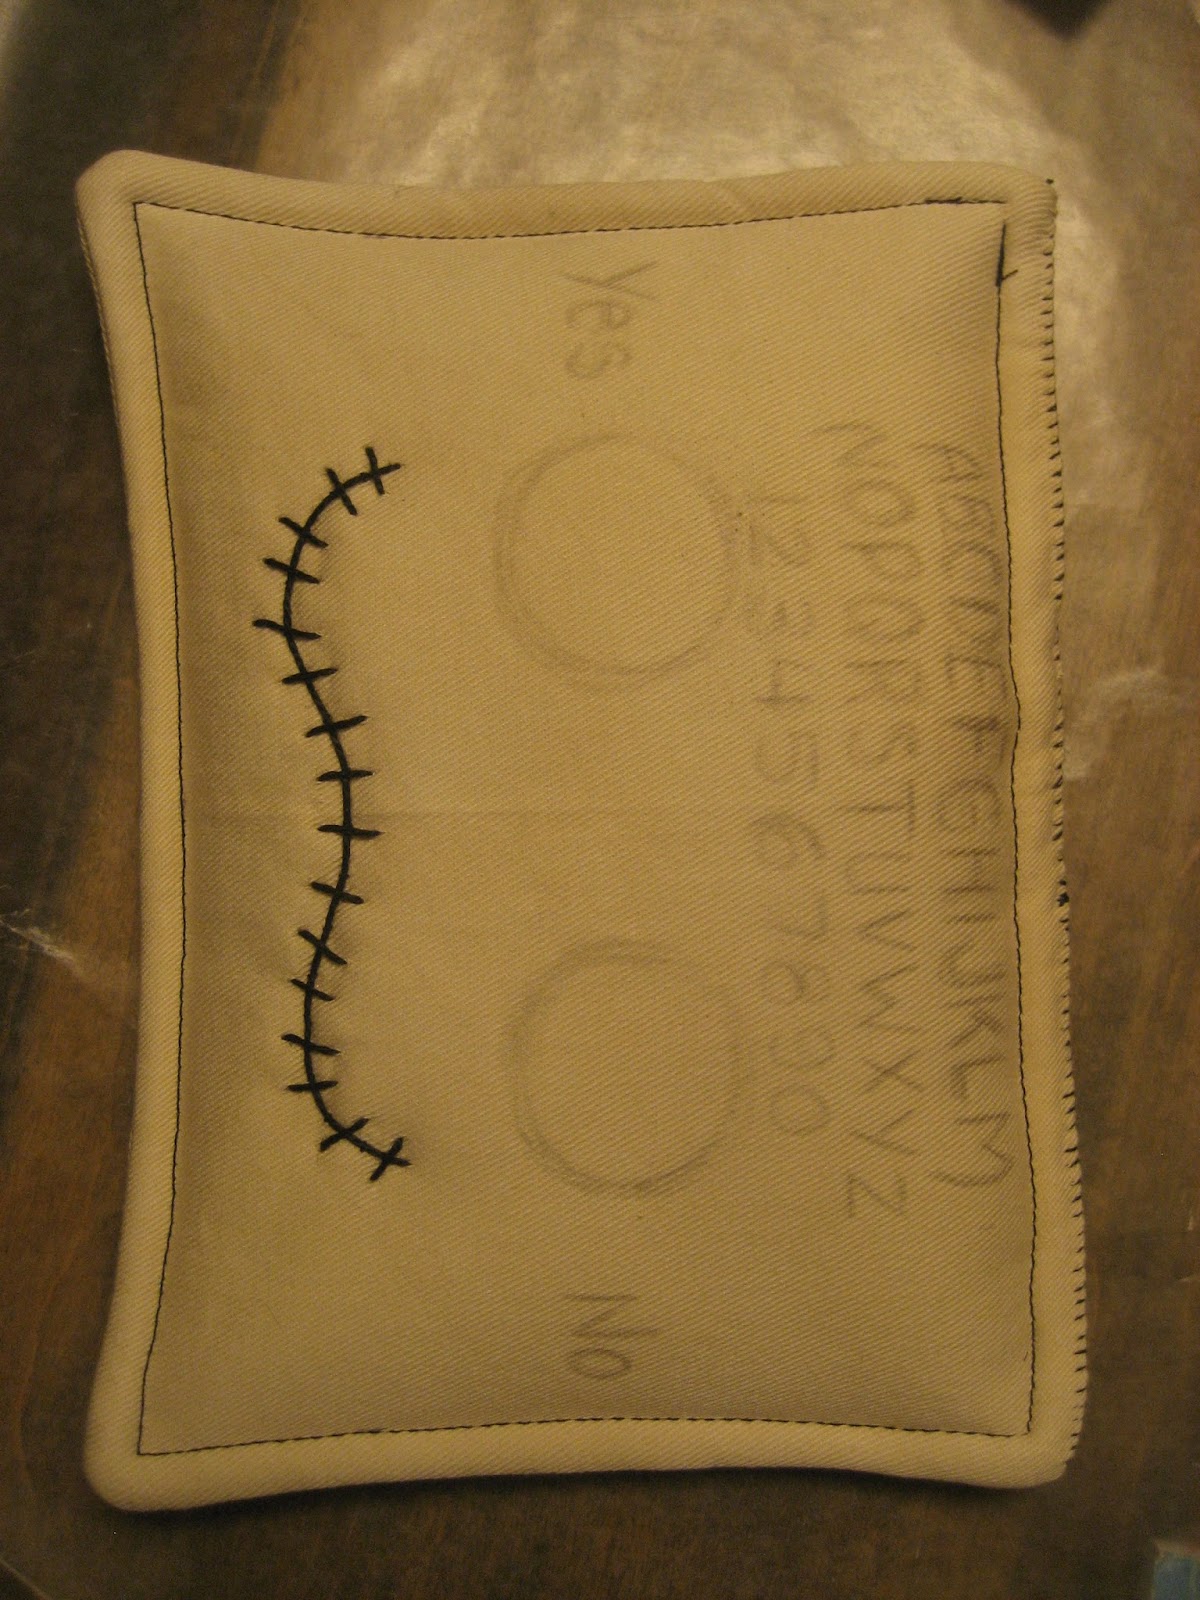
Step 15:
With your mechanical pencil, write “Yes” on one side of the eyes and
“No” on the other. Then, below the
mouth, write “Hello” and “Goodbye”.

Step 16:
Next, paint over the written letters. I like to do either white or a color as a base
and then paint black on top of that to give the letters more dimension.
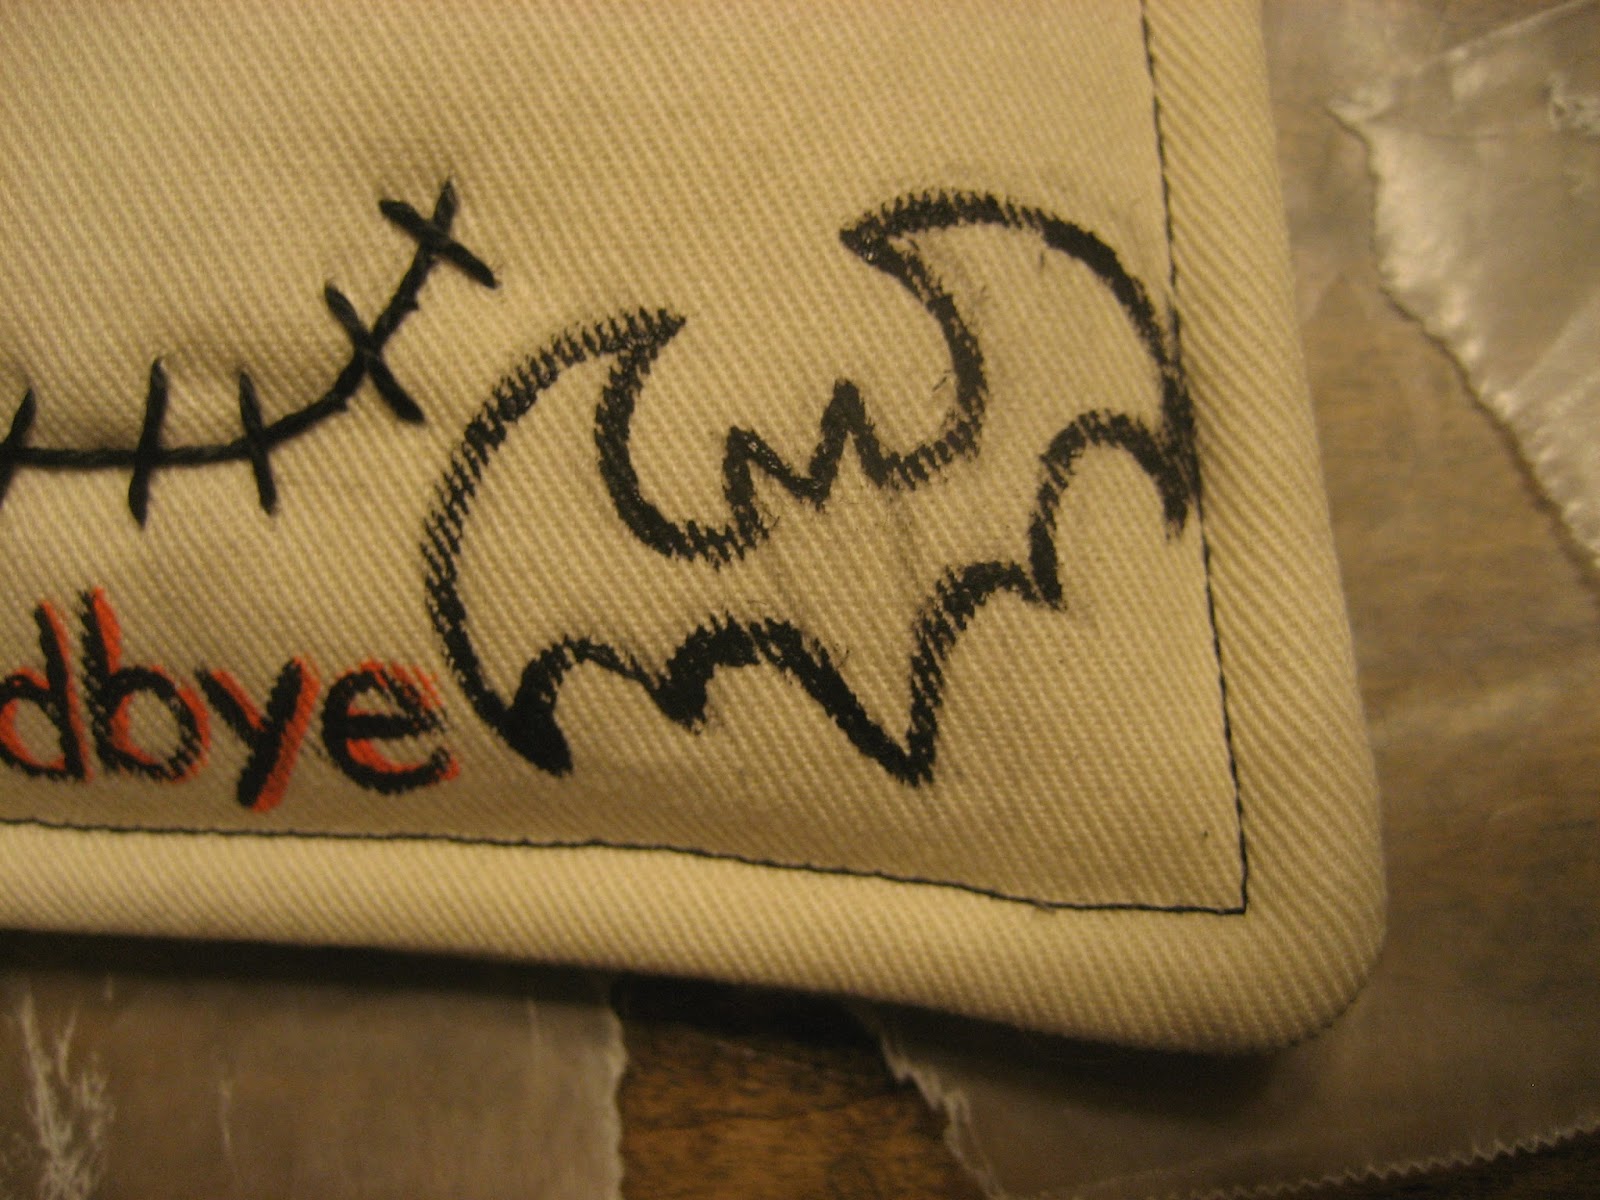
Step 17:
For this step, I will give instructions on how I paint basic Halloween
images. You can paint whatever you’d
like, but these are the ones that I have chosen for this tutorial. First we will paint the eyes!
Eyes: First, water down some black acrylic paint and let it bleed around the circles that you drew with your pencil. Next, paint black over the drawn circles. Using white paint, paint the inside of the circles. Follow the pictures for further instructions...


Bat:


Making the Body

Step 18:
Using the bottle-shaped pattern provided, trace and cut one piece out of
the coffee stained twill. Then cut
another piece that is a little larger.
Put the two pieces together, with the back of the fabric facing
out. Sew ¼” inside along the edges on
the sides and the bottom. Leave the top
open.
Step 19:
Next, cut along the edge of the smaller bottle shape, again cutting
angles at the corners. Also be sure to
cut little triangles at the curves. Turn
inside out and stuff until it is VERY full. We don’t want a floppy neck!

Step 20:
Fold in the top ¼” and use a basic sewing stitch to sew it closed.


Sewing and Attaching Legs
Step 21: Using the provided pattern, trace and cut two legs out of the
material that you have chosen for your legs.
Lay these two pieces on top of the same fabric with the upsides facing
in. Using your mechanical pencil, draw a
line ¼” inside the edge on sides and along curve. Sew along this drawn line, leaving the flat
edge on top open.

Step 22:
Cut off excess fabric, leaving ¼” border on outside of sewn lines. Be sure to cut your little triangles out
around the curves. Turn the legs right side
out and stuff them halfway with polyfil.

Step 23:
Fold the open part inside ¼”, then use the overcast stitch again to
attach the legs to the body. Make sure
the edge of the legs are flush with the edge of the body.


Attaching the Head
Step 24:
Now we are going to attach the head to the neck. The head should be centered on the neck. The top of the neck should be about 1 ½” from
the top of the head. I like to hold the
head in place on the neck where it looks good and trace around the neck, so
that it is easier for me to know where to stitch. Then, using upholstery thread, use the
overcast stitch to attach the head to the neck.
Once the head is attached at the top, I always reinforce it a little
lower down so that the head doesn’t flop around.


The Dress
Step 25:
To make the dress, cut a piece of fabric that is approximately 17" x 13". Fold in half and
sew together along the edge opposite the folded edge. Make sure the right sides are facing in.
Step 26:
Turn the dress right-side out.
Fold a half inch along the bottom, then fold again another half
inch. Using a basic sewing stitch,
stitch around the bottom hem.


Step 27:
Put the dress over the body with the finished edge at the bottom. Determine where you want the neck line to be
and do a loose stitch all the way around the neckline, about 1” from the top
edge. Pull it until it fits around the
neck with a ruffled effect, then tie it off.


Arms
Step 28: Cut two arms, using the arm pattern. Draw a line all the way around, ¼” from the
edge on the wrong side of the fabric.
Make marks on the straight edge to indicate the opening. The openings should be about 1 ¼”.

Step 29: Cut the excess around the arms and cut the little triangles
around the curves. Turn right side out.
Stuff the arms and then stitch along the openings.

Step 30: Making jointed arms: Using your doll needle (the super
long needle) and your upholstery thread, thread through one arm, through the
base of the neck and through the other arm. I like to thread through a few
times to ensure the joints will be secure. Pull tight and knot it in place.


Step 31: Add buttons. This is simply for
asthetics, so that it looks finished.

Accessories
Step 32: Making the clay skull for the bow and
the clay planchette. Please refer to the pictures below. I use Sculpey clay. Once
your pieces are sculpted, place them in your oven at 275 degrees for 15 minutes.
Once they have cooled, they are ready to paint! Once you have painted them, be sure to seal them so that the paint doesn't come off. Sculpey makes a sealant that dries in 30 minutes and fully dries in 24 hours.
Skull Center piece for bow:


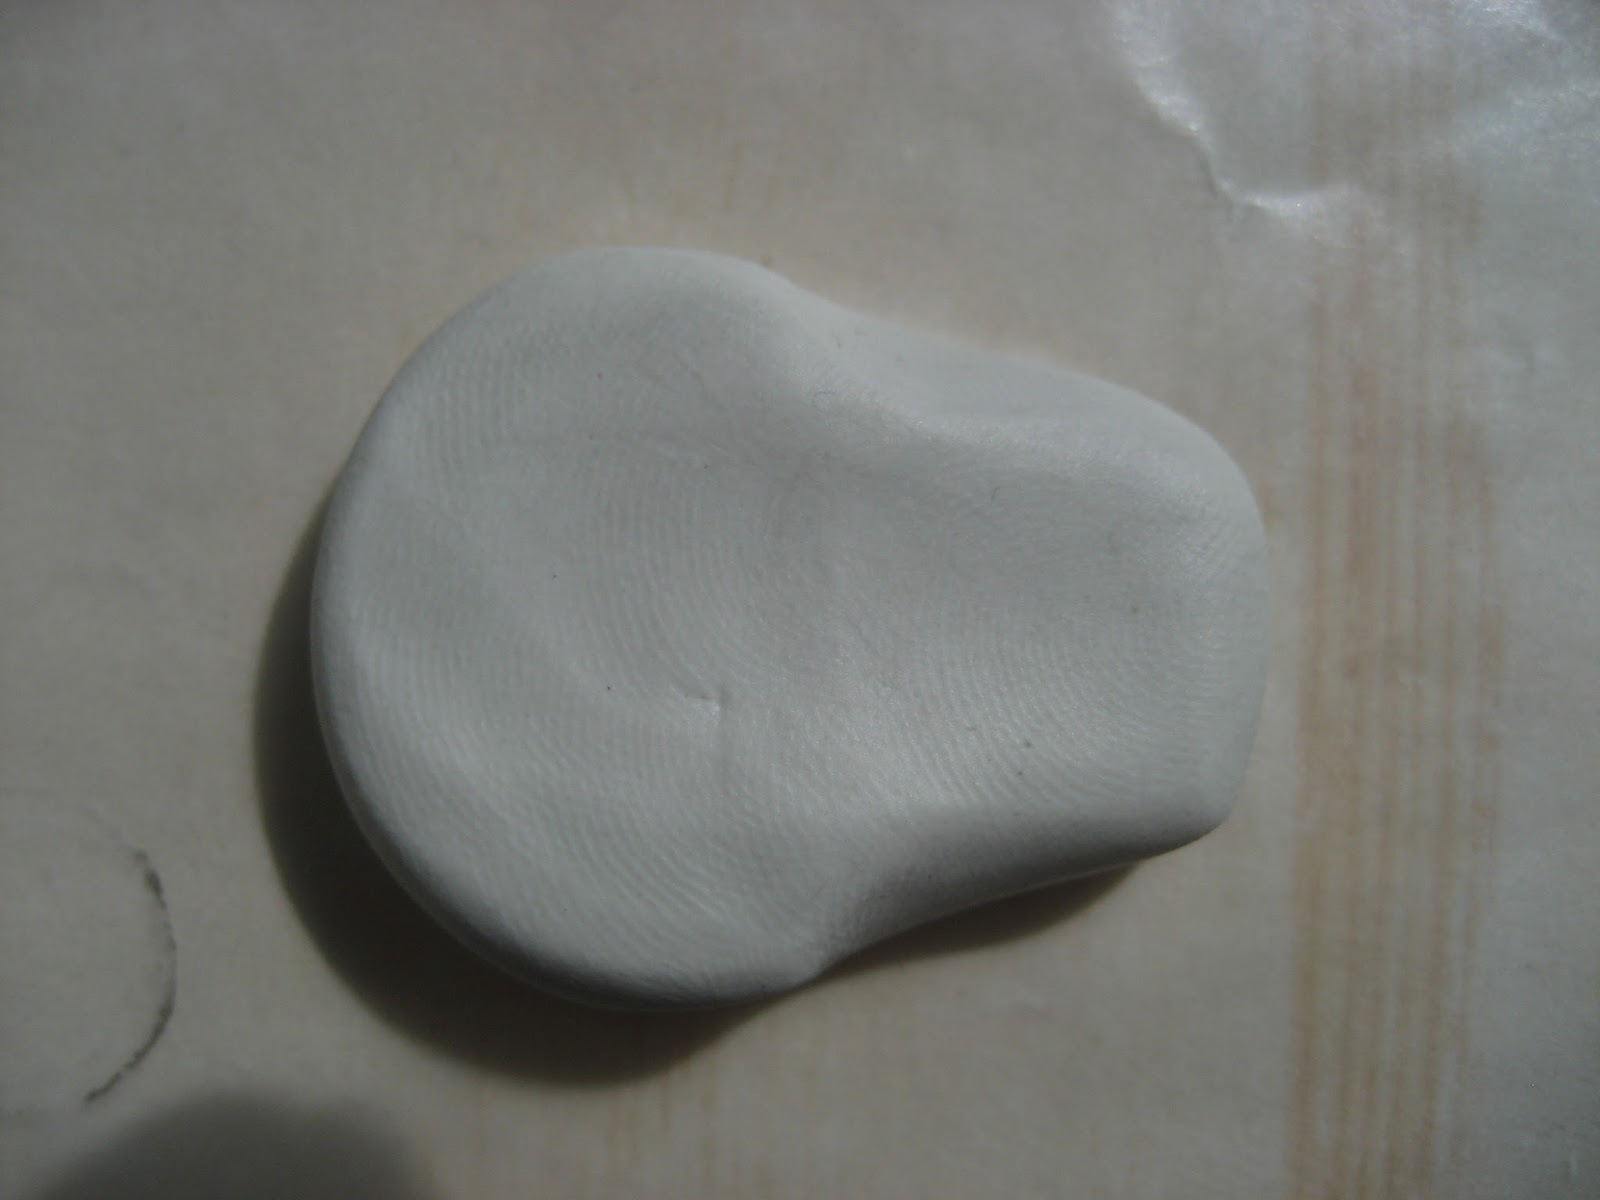


 |
| Score the back of the skull. |


 |
I like to press the planchette against a piece of wood to give it texture.   |
Step 33: To make the bow, cut two 3” x 4”
rectangles. Sew them together, wrong sides facing out, along three of the
sides. Trim at corners and turn right side out. Fold in the top and sew along the
seam.


Step 34: Fold the bow multiple times, like a
fan, and then sew it in the center to hold it in place. Sew the bow onto your Spirit board head, then super glue your clay skull
onto the bow.


 |
| You can sew the planchette directly on to the dress if you'd like. Sometimes I like to hang it from a chain. |
Final Thoughts

I hope you have enjoyed this tutorial and that it is not too
complicated to follow. This is the first time that I have ever released a
pattern or done a tutorial of this magnitude. I am sure there are supplies that
I may have forgotten to mention in the supply list, but I tried to get all of
the important ones. Thank you so much for stopping by! If you have any
questions or comments, feel free to leave them in the comments section and I
will reply as soon as I can (I will not have access to a computer from now
until October 19th) Until then, go forth into the world and make
Spirit Board dolls!
